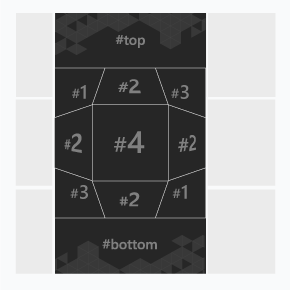
An ad format with two panels – initial and expanded. An initial panel consists of nine 3D elements in a form of a cube. A click on one of these elements opens an appropriate expanded panel. On central element (#4) click the expanded panel with video opens. Main panel animation may cover some part of a site’s content. Must include “X Close/Collapse” button in the upper right corner of the expanded panel.
– autoplaying video ad with sound.
General format requirements
Main panel
- Standard dimensions, WxH, px: 300×600
- File type: .png, .jpg
Expanded panel
- Standard dimensions, WxH, px: 900×600
- File type: .png, .jpg
Dimensions of banner images, WxH, px.
- 200×200 – 4 files for the ‘cube’ faces
- 300×150 – 2 files for top and bottom panel
- 900×600 – 4 files for the expanded panels, one of which is used as a video player background (900×600-vid in the template)
Video
- Video player container can be of any size within the expanded panel’s borders (video container size in the example is 600×337; this size can be changed)
- File type: .mp4
- Max duration: 30 sec
Audio
- User initiated (off by default)
Buttons
- “X Close” button in the upper right corner of the expanded panel (allows user to close the expanded stage)
Size
- up to 3 Mb
Download an archive with the template:
Working with the .zip archive (template)
- Unpack an archive with a creative template.Open folder images and change the images with yours. The file name is better to remain unchanged.
- In case of changing the file name and/or file extension, open file body.html with the text editor and edit the following code snippets:
- Files for the initial panel
Where images – folder name, 1.jpg – file name. These files serve as ‘cube’ faces.
- HTML code
Where top.jpg – top panel file name.
bottom.jpg – bottom panel file name.
- Files for the expanded panel
The number of initial panels coincides with the number of the corresponding expanded panels. For example, on element 200×200 #1 (file 1.jpg) click, the panel 900×600 #1 (file 900×600-1.jpg) expands.
Files with the same name use as a source the same picture so they are equal.
- In case the link to the target page for top, bottom, expanded panels should be different, open file body.js with the text editor and indicate the target URL link (globalHTML5Api.click(‘https://yourdomain.com’)) for an appropriate panel – top (“Link – Top”), bottom (“Link – Bottom”) and expanded (Link – 1, 2, 3):
- body.js file code
- Video file should be named video.mp4 and placed in the root directory of the .zip file.
- Save and archive all banner assets in .zip (you should archive the files, not the folder that contains the files).
Event tracking
- View
- Confirmed view
- Click
- Expand by user
- Collapse by user
- Play
- Pause
- Resume
- Sound on
- Sound off
- Progress (firstQuartile, midpoint, thirdQuartile, complete)
– Uses the main thread for more than 60 seconds in total
– Uses the main thread for more than 15 seconds in any 30-second window
– Uses more than 4 megabytes of network bandwidth